31 Dec 2012


How to create your own Theme in Android

Theme in Android means applying the same style to a single activity or whole application .
Note:
  • If you will apply theme to a single activity then the style will appear to that particular activity .
  • If you will apply theme to whole application then the style will appear to the whole application.
Theme 1
Now if you like a theme and want to alter it of tweak it then follow this blog.
  • Now start with a project by selecting new-> file-> Android Application Project.
  • Fill the following details in the project.
  • Theme 2
    • Application Name- AndroidTheme
    • Project Name -AndroidTheme
    • Package Name- theme.android
    • Minimum required SDK - 2.2 froyo  and then click next and next then finish.

29 Dec 2012


How to change the Theme in Android App

Theme in Android means applying the same style to a single activity or whole application .
Note:
  • If you will apply theme to a single activity then the style will appear to that particular activity .
  • If you will apply theme to whole application then the style will appear to the whole application.
Theme 1
Now lets us learn how to change the theme in android.
  • Now start with a project by selecting new-> file-> Android Application Project.
  • Fill the following details in the project.
  • Theme 2
    • Application Name- AndroidTheme
    • Project Name -AndroidTheme
    • Package Name- theme.android
    • Minimum required SDK - 2.2 froyo  and then click next and next then finish.

28 Dec 2012


Various Themes available in Android

A Theme in Android is a style which is applied to whole application or a single activity.Android has provided a large collection of themes defined under R.style class.
So the various Themes which are available according to the version are given below.


Theme

In API level 10 or lower
  • <style name="Theme">  -This is the default themes for app in API level 10 or lower.other variant for this themes are:
    • <style name="Theme.NoTitleBar">
    • <style name="Theme.NoTitleBar.Fullscreen">
  • <style name="Theme.Light"> -It has a light background with dark text on the top.other variant for this themes are:
    • <style name="Theme.Light.NoTitleBar">
    • <style name="Theme.Light.NoTitleBar.Fullscreen">
  • <style name="Theme.Black"> -Its background is completely black ,useful for image viewer and media player .Other variant for this themes are:
    • <style name="Theme.Black.NoTitleBar">
    • <style name="Theme.Black.NoTitleBar.Fullscreen">
  • <style name="Theme.Wallpaper"> -It puts user selected themes as a background.Other variant for this themes are:
    • <style name="Theme.Wallpaper.NoTitleBar">
    • <style name="Theme.Wallpaper.NoTitleBar.Fullscreen">
  • <style name="Theme.WallpaperSettings"> - It is for wallpaper setting activity ,designed to be a transparent background with a dark shade so that previous activity remains visible in the background.
  • <style name="Theme.Light.WallpaperSettings"> - It is for wallpaper setting activity ,designed to be a transparent background with a light shade so that previous activity remains visible in the background.
  • <style name="ActiveWallpaperSettings"> -Style to apply on the top of wallpaper setting themes when it is being shown on the top of real walpaper.
  • <style name="PreviousWallpaperSettings"> -Style to apply on the top of wallpaper setting themes when it is being shown on the top of real walpaper.
  • <style name="Theme.Translucent"> -It allows you to see through them the window behind.Other variant are:
    • <style name="Theme.Translucent.NoTitleBar">
    • <style name="Theme.Translucent.NoTitleBar.Fullscreen">

27 Dec 2012


How To Create List View In Android

List view is a ViewGroup single dimensional and scrollable view to the user.List View has some important points:
  • ListView is automatically inserted in the layout using ListAdapter(a bridge between ListView and data which backs the list).
  • android.widget.ListView is the class which needs to import for implementing the list view.
List view 1
so lets us learn how to user list view:
  • First start the eclipse and select new-> android application project.
List view 2
  • Now fill the following details in the android application project interface.
    • Application Name- ListView
    • Project Name-ListView
    • Package Name-list.view
    • and then click next ->next and then finish.
List view  3

25 Dec 2012


How To Create Grid View In Android

GridView is a ViewGroup which provides two-dimensional and scrollable view to the user.Grid view has some important points:
  • GridView is automatically inserted in the layout using  ListAdapter(a bridge between ListView and data which backs the list).
  • android.widget.GridView is the class which needs to import for implementing the grid view.

so lets us learn how to create grid view.
  • first start the eclipse and select new-> android application project.
Grid View 1

  • Now fill the following details in the android application project interface.
    • Application Name- GridView
    • Project Name-GridView
    • Package Name-grid.view
    • and then click next ->next and then finish.

Grid View 2
  • Now in the project GridView open the activity_main.xml file under res-> layout-> activity_main.xml and replace the whole lines with these new lines.
   <LinearLayout xmlns:android="http://schemas.android.com/apk/res/android"  
     android:layout_width="fill_parent"  
     android:layout_height="fill_parent">  
     <GridView  
       android:id="@+id/gridView1"  
       android:layout_width="match_parent"  
       android:layout_height="match_parent"  
       android:background="#aabbcc"  
       android:numColumns="2"  
       android:verticalSpacing="5dp" >  
     </GridView>  
   </LinearLayout>  

24 Dec 2012


How To Create Options Menus in Android Application

In Android application, menus are the common user interface components which gives user a dynamic user experience. The other details about menus are:
  • android.view.Menu is class which provides the functionality of menu.
  • Till the Android version 2.3 , dedicated menu hardware button is provided for the menu option.
  • After Android version 3.0 and higher, no dedicated button is provided but instead another ways are provided according to type of menu to access the menu.
  • There are three types of Menus or action used in all version of menus.
    1. Option menu and action bar-It is presented by action bar as a combination of on-screen action bar and overflow options.
    2. Context menu and contextual action mode-It is presented by contextual action mode for enabling the menu and selected item.
    3. Pop up menu
so now lets learn how to add Option menus in our android application.
  • First start your eclipse and select new -> project and click next.
  • Now fill with following details:
    • Project name- OptionMenu
    • Application name-OptionMenu
    • package name-option.menu
    • Minimum required SDK- select android 3.0
    • tick on create custom laucher icon.
    • Name the activity -Optionmenu
    • tick on create project in workspace.
Option menu 1
  • In Config Launcher Icon window click Next and finally choose Blank Activity in Create Activity window and the click Next and then Finish.
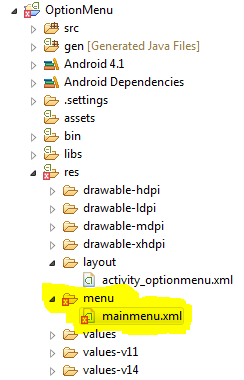
  • Now for creating menu we will use xml format to define menu item.so open.so for creating the xml file open the project OptionMenu-> res-> menu and right click on menu sub-folder and select the new file name it as mainmenu.xml.

Option menu 2
  • Now open the mainmenu.xml file and add the following xml lines in the file.
1:    <menu xmlns:android="http://schemas.android.com/apk/res/android">  
2:      <item android:id="@+id/facebook"   
3:        android:title="@string/facebook"   
4:        android:icon="@drawable/facebook">  
5:      </item>  
6:      <item android:id="@+id/wordpress"   
7:        android:title="@string/wordpress"   
8:        android:icon="@drawable/wordpress">  
9:      </item>  
10:      <item android:id="@+id/google"  
11:         android:title="@string/google"  
12:         android:icon="@drawable/google" android:showAsAction="ifRoom">  
13:      </item>  
14:    </menu>  

  • Now let's understand the details of above mainmenu.xml lines.
    • At line 1,we have added first menu item in which we have given title and icon for the menu.
    • Title is defined in the string.xml file.
    • Icon image is given in the drawable folder.
    • Similarly we have added three menu item in th emainmenu.xml file.
    • At line 12 ,android:showAsAction="ifRoom"  is added which means it will appear in the action bar to provide quick access.
  • Now open the strings.xml file by clicking res-> values-> strings.xml and the few lines to it so that it finally look like this.In the file given below we have added the three Title string for the menu like Facebook, Google., WordPress. 
1:  <resources>  
2:    <string name="app_name">OptionMenu</string>  
3:    <string name="hello_world">Hello world!</string>  
4:    <string name="menu_settings">Settings</string>  
5:    <string name="title_activity_main">MainActivity</string>  
6:    <string name="facebook">facebook</string>  
7:    <string name="wordpress">wordpress</string>  
8:    <string name="google">google</string>  
9:  </resources>  

23 Dec 2012


How To Replace Default Background Of Multistate ImageButton In Layout


Multistates buttons are useful for showing the various states of buttons like pressed,focussed,normal state. For creating multistate button in the layout we need to use two classes .
  • First one, android.graphics.drawable.StateListDrawable class,which creates a drawable objects to show different images on same graphics based on the state of objects.Here each graphics is represented by <item> elements inside single <selector> elements.
  • Second one, android.widget.ImageButton class.It display an button with image in background and can be pressed.IT changes color during different state of button like focused, pressed etc.
So lets begin the programming step by step:
  • first open the eclipse select File -> New -> Project.
Default Multistate 1
  • Then Select Android -> Android Application Project and then click next.
  • Now fill with following details:
    • Project name- MultistateButton
    • Application name-MultistateButton
    • package name-multistate.Button
    • Minimum required SDK- select android 3.0
    • tick on create custom laucher icon.
    • tick on create project in workspace.
Default Multistate 2
  • In Config Launcher Icon window click Next and finally choose Blank Activity in Create Activity window and the click Next and then Finish.
  • Now we will create Multistate button file name as multistate_button.xml .but before doing this let us know the different state of button.
    • drawable- must for showing the normal state image.must refer to the image.
    • state_pressed-when object is pressed(touched/clicked) ,by default remains  non-pressed .
    • state_focused-when object has input focussed(when user selects text input).
    • state_hovered-when object is hovered by cursor , very similar to focused state.
    • state_selected-when object are selected through directional control inside focused state.
    • state_checkable-when object is checkable.object should be a type of check or unchecked.
    • state_checked-when object is checked.
    • state_enabled-when objects are enabled(are able to receive clicks or touch)
    • state_window_focused-when application window has focus means app comes in foreground.
  • Now in multistate_button.xml file we will use pressed, focused. so lets begin.
    • select MultistateButton project.
    • right click on drawable folder and click on new.
    • and write multistate_button.xml and then finish.

Translate